Create an identity
Creating an identity is the foundational step for securing any resource on your NetFoundry network. An identity is a cryptographically verifiable object used to authenticate to the controller. It reliably identifies applications that want to connect to the overlay network. The controller then uses the identity and established policies to authorize which specific services the identity has access to. This guide walks you through creating a new identity in the console.
Steps
Follow these steps to create a new identity:
-
From the console, select your network from the dropdown in the left-hand menu.
-
Click Identities from the same menu.
-
Click the + icon to create a new identity.
-
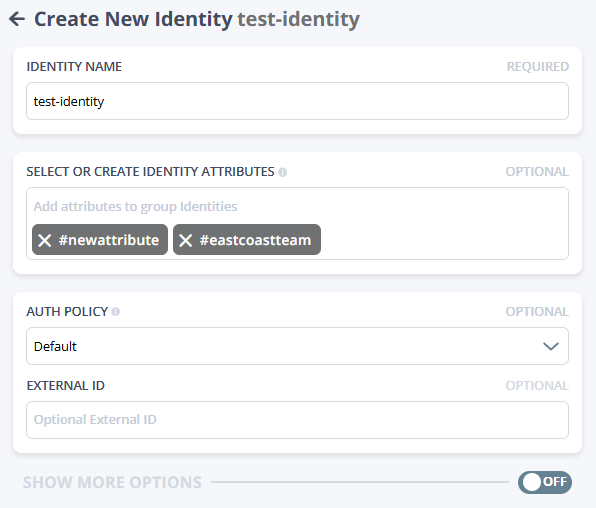
Fill in the fields:
- Identity name: Enter a unique name for the identity.
- Select or create identity attributes: Choose existing attributes or create new ones to define the identity's characteristics.
- Auth policy: Select an authentication policy for the identity.
- External ID: Enter an external identifier, if applicable.
-
Toggle the Show more options switch to reveal more optional settings you can fill in.
Most identities won't need these, but they're available when you want more control. One Time Token is set as the default. See Advanced options below for details.
-
Click Save to create the identity.
You're returned to the list of identities, where you can see the new identity listed.
-
Under the Token column, download the JWT (JSON Web Token—recommended for desktop) or use the QR code (recommended for mobile) to register the identity.
To share the JWT enrollment token (if you selected One Time Token*) via email, click into the identity to get to the Edit Identity page, then click Send registration email.
API calls panel
When you create a resource, the console automatically builds the API request that the platform sends in the background. The API calls panel shows that request in JSON. The panel is read-only.
This panel lets you see the exact payload the controller receives when you create the resource. It's the same JSON you'd send if you were automating resource creation through the API.
The URL at the top of the panel is the API endpoint that receives the request.
Advanced options
Enrollment type
Choose how the identity enrolls into the network. The default is One Time Token, which means the identity uses a single-use enrollment token in the form of a JSON Web Token (JWT) to join the network. Other options include:
- Certificate Authority: Requires the connecting client to supply a certificate that has been signed by a trusted CA defined in the Authentication section to successfully enroll or authenticate.
- UPDB: Uses NetFoundry's user/password database for enrollment (internal auth store).
- None: Indicates that none of the standard methods listed above are explicitly required for the client to enroll. This is typically selected when enrollment validation is handled automatically by an integrated system or via configuration.
Other options may be available depending on your auth policies and network configuration.
Admin
The Is admin toggle marks this identity as a controller-level administrator. Leave this off unless you specifically need an admin identity for automation purposes.
Admin identities have full, unrestricted access to the Network Management API (formerly controller API) and can manage all configuration across the network. They should only be used for automated administrative tasks (like provisioning resources via API/CLI) and remote management, not for general client application access. Enabling this toggle for a user identity presents a significant security risk.
Hosting cost and precedence
These fields allow you to influence how the network routes traffic to services hosted by this identity.
- Hosting cost: A numeric value applied as a static base cost for any service hosted by this identity.
- How it works: This value is added to real-time metrics (like link latency, router cost, and current circuit load) to calculate the total path cost. While lower values generally make this identity a preferred host, high network latency or heavy load can still shift traffic to a different path.
- Hierarchy: This is the default value. It can be overridden by a specific cost defined in a hosting configuration or a service-specific cost assigned to the identity.
- Precedence: The routing precedence to apply when multiple identities can host the same service.
- Default: The standard setting; suitable for almost all use cases.
- Required: Marks this identity as a primary host. The network will always attempt to route to "Required" terminators before "Default" ones.
- Failed: Marks this identity as unavailable. Use this to manually drain traffic from an identity or temporarily remove it from routing decisions.
These settings only apply when this identity is acting as a host for a service.
Custom tags
Use Name and Value fields to attach any custom key–value tags to the identity. Tags let you store metadata that's meaningful to your organization or automation tooling. They're optional and don't affect routing or access unless you build logic around them.
These are not the same as identity attributes. Identity attributes are used for policy decisions (the identities allowed to bind or dial a given service). Custom tags are for your organizational use, such as inventory management, billing, or notes.
App data
App data lets you attach arbitrary JSON that your applications or automation might use. This isn't used by the platform itself; it's simply a freeform JSON object that travels with the identity.
If you don't have a specific use case, you can leave this as {}.